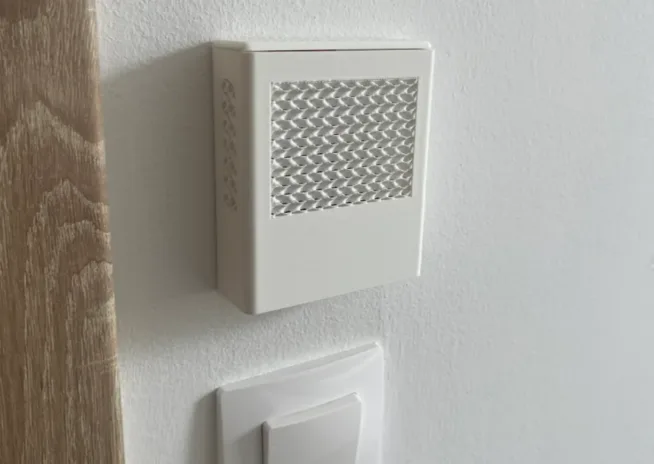
The article could be titled “How I Fine-tuned a Fancy 3D Printed Box with a Radiation Shield for a Weather Station for the SEN5x Sensor and Air Board Control Board”.
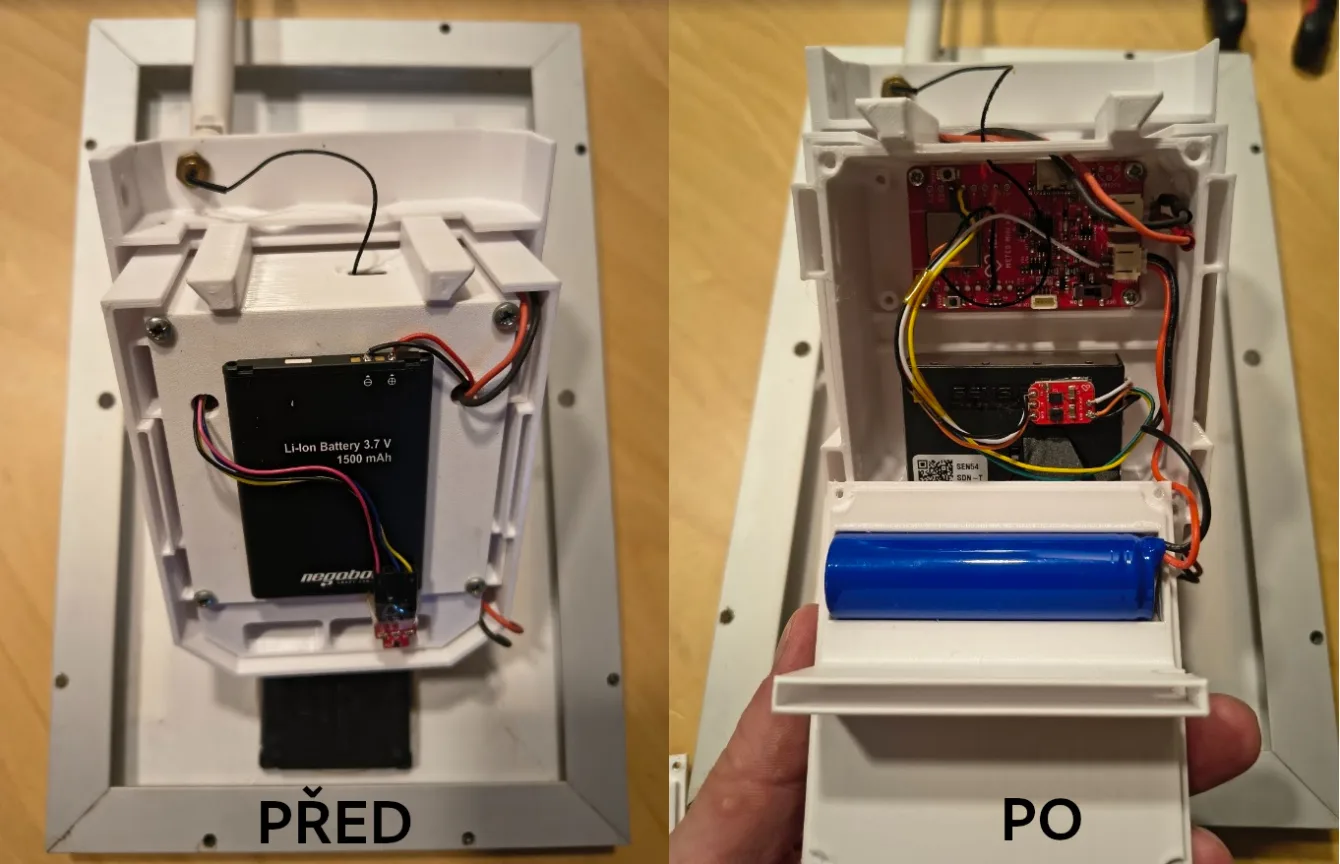
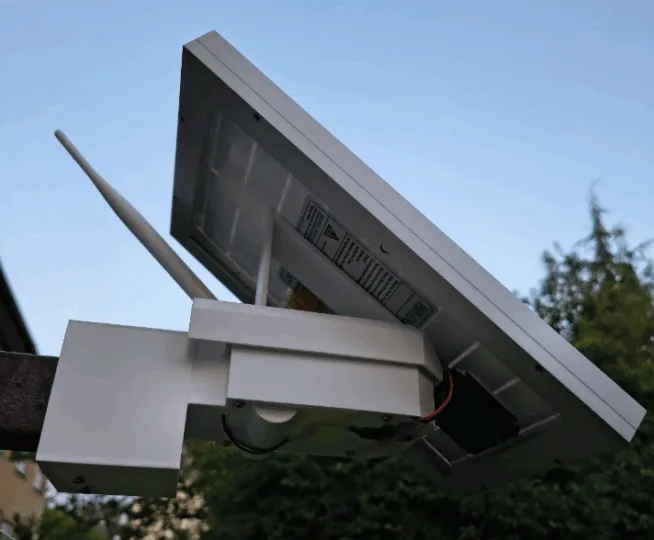
And that would perfectly capture my effort. I enhanced this box by adding space for a 18650 battery with a JST connector, added openings for cable routing and an external antenna, and I also added a Meteo Mini with ESP32-C3 to the existing mounting for the AirBoard with ESP8266, which is available in a version with a PCB antenna or with an external antenna via an IPEX connector.
The original box (I wrote about it here) is great – no doubt about it, but as with all projects, there’s always someone (that was me :-D) who thinks, “Hmm, I could use this little detail, and then this one.” And so I got to work.
Note: I am not an expert in designing 3D models for 3D printing. I made the modifications in Tinkercad, as I don’t know anything better, and for my mini adjustments, it has been sufficient so far.
My Needs:
– Use of MeteoMini instead of AirBoard (both from laskakit.cz). MeteoMini is based on a module with ESP32-C3, which is either equipped with a PCB antenna or an IPEX connector – and that’s what I need for outdoor placement. Thanks to the IPEX connector, I can add an external antenna and improve the Wi-Fi range.
– Power supply from a solar panel – both boards, AirBoard and Meteo Mini, have the option to connect a solar panel with a maximum voltage of 8V (this maximum must also consider the open-circuit voltage of the solar panel, i.e., when the battery is fully charged and almost no current is drawn from the solar panel – the voltage from the solar panel is then higher than the rated).
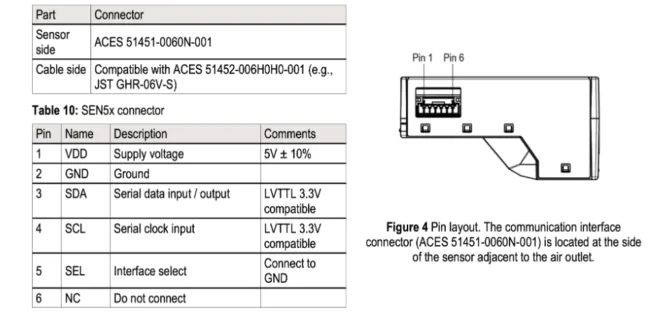
– Use of the SEN5x sensor, in my case, SEN55 – here lies a minor disadvantage when using Meteo Mini instead of AirBoard. AirBoard has a boost converter from the battery voltage to 5V, which is required to power the SEN5x.
However, when using Meteo Mini, a bit of tinkering is needed – adding an external converter from battery voltage to 5V. The converter will work even if powered from the uShup connector (3.3V) to 5V.
I chose to boost the voltage directly from the battery because it has a higher efficiency.
My converter design is sold by laskakit https://www.laskakit.cz/laskakit-bat-boost-menic-5v-0-6a-dio6605b/ and I used exactly this one.
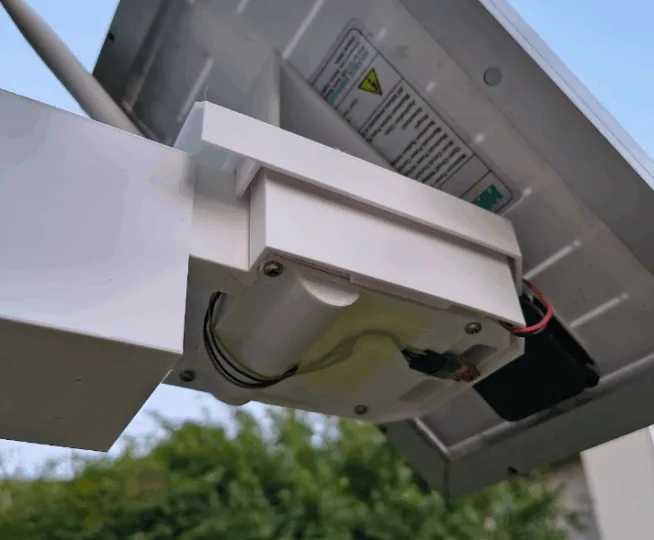
– I mounted the box to a clothes drying rack, which has a square structure measuring 42x42mm.
3D Printing
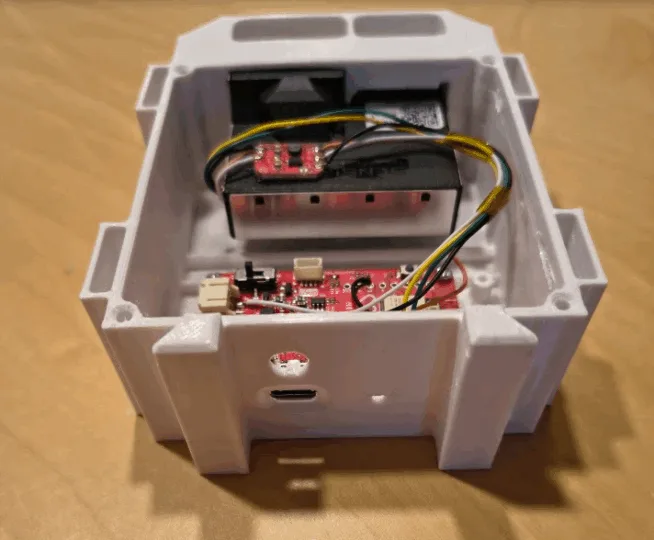
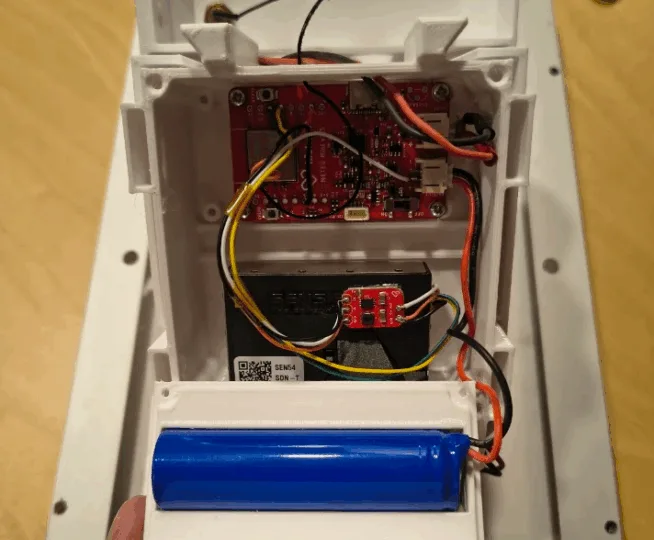
You can find the original model of the box here. My modified version consists of 4 parts – the main part where the AirBoard with ESP8266 or Meteo Mini with ESP32-C3 is screwed in, a radiation shield that protects the sensors inside the box from heating, the bottom part (the modified model now has an opening for routing the cable from the external sensor outside the box at the bottom), where the 18650 battery is placed, and finally a holder for the drying rack structure.
You can find my modified model at https://www.printables.com/model/1338580-krabicka-s-radiacnim-stitem-pro-meteostanice-laska
Recommended material: PETG, PC-ABS, ASA (yes, PETG really withstands both winter and summer).
Perimeters: 3 or 4
Supports: everywhere
Profile: 0.2mm STRUCTURAL (Prusa Slicer)
Hardware
I used components from the laskakit e-shop. The reason is the very low power consumption of their boards, and they are also pre-prepared for use, for example, as a weather station.
18650 battery with JST connector – https://www.laskakit.cz/geb-li-ion-baterie-1×18650-1s1p-3-7v-3200mah/
AirBoard (unused, because the ESP8266 module does not have the option to connect an external antenna) – https://www.laskakit.cz/laskakit-airboard-8266-deska-pro-mereni-kvality-vzduchu/
(Used) Meteo Mini with ESP32-C3 in the version with IPEX connector for an external antenna – https://www.laskakit.cz/laskakit-meteo-mini/
Boost converter to 5V (Meteo Mini does not have a boost converter to 5V to power the SEN55, AirBoard does. Unfortunately, AirBoard does not allow connecting an external antenna, which is more important for me) – https://www.laskakit.cz/laskakit-bat-boost-menic-5v-0-6a-dio6605b/
SEN55 – https://www.laskakit.cz/senserion-sen55-sdn-t-opticky-senzor-kvality-ovzdusi/ but you can use the cheaper variant SEN54 (it does not measure VOC and NOX, which is not meaningful to use in an outdoor environment anyway) – https://www.laskakit.cz/senserion-sen54-sdn-t–opticky-senzor-kvality-ovzdusi/
The code is the same for both types.
Note: SEN5x is not intended for outdoor measurement! But it works, the price is acceptable, and I have been using it for several years 🙂
The connecting cable, which I cut, and the part that is for AirBoard I soldered directly to Meteo Mini – https://www.laskakit.cz/laskakit-airboard-propojovaci-kabel-pro-senserion-sen5x-opticky-senzor-kvality-ovzdusi/
Wiring:
I connected the power from the battery to the input of the boost converter, and the output from the boost converter to the power supply of SEN5x.
I connected the ground together. I connected the SEL input to GND (important!).
SDA to pin 19, SCL to pin 18, and the EN input of the boost converter to GPIO5.
External antenna and pigtail – https://www.laskakit.cz/antena-5dbi-19cm-2-4g-bila/, https://www.laskakit.cz/pigtail-mhf3-ipex3-sma-female–kabel-1-15mm–15cm/
Software
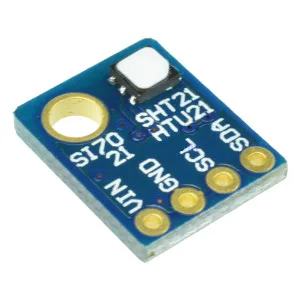
For my needs, I measure temperature twice – once through SEN55 inside the box, and the second time using the SHT40 sensor, which I placed at the bottom of the 3D printed box – to have a comparison of values throughout the year.
The third measured value that is sent is PM10 from SEN5x (SEN54 or SEN55).
All available data is sent to the Serial port, selected data then to the server TMEP.cz, where the settings are as follows:
GUID1: temperature
GUID2: temperatureSHT
GUID3: PM10
TMEP.cz takes care of data storage, visualization on the web, and through a mobile app.
Of course, you can adjust the code and server settings according to your needs – prefer temperature, humidity, and PM? No problem 🙂
/*
 * Code for MeteoMini and SEN5x
 * Measured values are sent to the Serial Monitor and to TMEP.cz.
 *
 * Required libraries:
 * https://github.com/Sensirion/arduino-i2c-sen5x
 * https://github.com/adafruit/Adafruit_SHT4X
 * https://github.com/madhephaestus/ESP32AnalogRead
 *
 * ESP32 library: v2
 *
 * chiptron 2025
 */
// --- Libraries ---
#include <WiFi.h>
#include <SensirionI2CSen5x.h>
#include <Wire.h>
#include <ESP32AnalogRead.h>
#include <HTTPClient.h>
#include "Adafruit_SHT4x.h"
// --- Constants and global variables ---
#define SEN5xGPIO 5                  // Pin for controlling the converter that powers SEN5x
#define sleepTimeSec 900             // Sleep interval in seconds
SensirionI2CSen5x sen5x;             // Object for SEN5x
Adafruit_SHT4x sht4 = Adafruit_SHT4x(); // Object for SHT4x
ESP32AnalogRead adc;                 // For reading battery voltage
float vBat = 0.0;                    // Battery voltage
// Server address and GUIDs for TMEP.cz
String serverName = ""; // fill in your server name
String GUID1 = "teplota";
String GUID2 = "teplotaSHT";
String GUID3 = "PM10";
// Variables for errors
uint16_t error;
char errorMessage[256];
// WiFi credentials
const char* ssid = "SSID";
const char* password = "PASSWORD";
// --- Setup function ---
void setup() {
  Serial.begin(115200);
  Wire.begin(19, 18);                // Set I2C pins
  pinMode(SEN5xGPIO, OUTPUT);
  digitalWrite(SEN5xGPIO, HIGH);     // Turn on SEN5x
  delay(500);
  // --- Initialize SEN5x ---
  sen5x.begin(Wire);
  float tempOffset = 0.0;
  error = sen5x.setTemperatureOffsetSimple(tempOffset);
  if (error) {
    Serial.print("Error setting temperature offset: ");
    errorToString(error, errorMessage, 256);
    Serial.println(errorMessage);
    digitalWrite(SEN5xGPIO, LOW);
    delay(500);
    Serial.flush();
    esp_sleep_enable_timer_wakeup(sleepTimeSec * 1000000);
    esp_deep_sleep_start();
  } else {
    Serial.print("Temperature offset set to ");
    Serial.print(tempOffset);
    Serial.println(" °C (only SEN54/SEN55)");
  }
  // Start SEN5x measurement
  error = sen5x.startMeasurement();
  if (error) {
    Serial.print("Error starting measurement: ");
    errorToString(error, errorMessage, 256);
    Serial.println(errorMessage);
    digitalWrite(SEN5xGPIO, LOW);
    delay(500);
    Serial.flush();
    esp_sleep_enable_timer_wakeup(sleepTimeSec * 1000000);
    esp_deep_sleep_start();
  }
  // --- Initialize ADC ---
  adc.attach(0);
  // --- Connect to WiFi ---
  WiFi.begin(ssid, password);
  Serial.println("Connecting to WiFi...");
  uint8_t attempts = 0;
  while (WiFi.status() != WL_CONNECTED) {
    delay(500);
    Serial.print(".");
    attempts++; // 10 attempts to connect, otherwise sleep
    if (attempts > 10) {
      digitalWrite(SEN5xGPIO, LOW);
      delay(500);
      Serial.flush();
      esp_sleep_enable_timer_wakeup(sleepTimeSec * 1000000);
      esp_deep_sleep_start();
    }
  }
  Serial.println();
  Serial.print("Connected, IP address: ");
  Serial.println(WiFi.localIP());
}
// --- Main loop ---
void loop() {
  // --- Read values from SEN5x ---
  float pm1_0, pm2_5, pm4_0, pm10_0;
  float humidity, temperature, vocIndex, noxIndex;
  // Wait for valid data from the sensor
  while ((isnan(pm10_0) || pm10_0 == 0.0) || (isnan(temperature) || temperature == 0.0)) {
    sen5x.readMeasuredValues(pm1_0, pm2_5, pm4_0, pm10_0, humidity, temperature, vocIndex, noxIndex);
    Serial.println("Waiting for data from SEN5x...");
    delay(1000);
  }
  // Read data twice just to be sure
  for (uint8_t i = 0; i < 2; i++) {
    sen5x.readMeasuredValues(pm1_0, pm2_5, pm4_0, pm10_0, humidity, temperature, vocIndex, noxIndex);
    delay(1000);
  }
  // --- Read values from SHT4x ---
  float tempSHT = 0.0;
  int humSHT = 0;
  if (!sht4.begin()) {
    Serial.println("SHT4x not found - not connected or check wiring.");
  } else {
    Serial.println("SHT4x found.");
    sht4.setPrecision(SHT4X_LOW_PRECISION); // Set precision
    sht4.setHeater(SHT4X_NO_HEATER);        // Turn off heating
    sensors_event_t hum, temp;
    sht4.getEvent(&hum, &temp);
    tempSHT = temp.temperature;
    humSHT = hum.relative_humidity;
    Serial.print("Temperature SHT4x: "); Serial.println(tempSHT);
    Serial.print("Humidity SHT4x: "); Serial.println(humSHT);
  }
  // --- Read battery voltage ---
  vBat = adc.readVoltage() * 1.769387755; // Correction according to divider (R2=320k, R1=100k)
  // --- Print values to Serial Monitor from SEN5x ---
  Serial.print("Temperature: "); Serial.println(temperature);
  Serial.print("Humidity: "); Serial.println(humidity);
  Serial.print("PM2.5: "); Serial.println(pm2_5);
  Serial.print("PM10: "); Serial.println(pm10_0);
  Serial.print("Voltage: "); Serial.println(vBat);
  // --- Send data to TMEP.cz ---
  if (WiFi.status() == WL_CONNECTED) {
    HTTPClient http;
    // Construct URL with values
    String serverPath = serverName + GUID1 + "=" + temperature + "&" +
                        GUID2 + "=" + tempSHT + "&" +
                        GUID3 + "=" + pm10_0 + "&v=" + vBat;
    http.begin(serverPath.c_str());
    int httpResponseCode = http.GET();
    if (httpResponseCode > 0) {
      Serial.print("HTTP response: ");
      Serial.println(httpResponseCode);
      String payload = http.getString();
      Serial.println(payload);
    } else {
      Serial.print("HTTP error: ");
      Serial.println(httpResponseCode);
    }
    http.end();
  } else {
    Serial.println("Wi-Fi disconnected");
  }
  // --- Put the device to sleep ---
  digitalWrite(SEN5xGPIO, LOW); // Turn off SEN5x
  delay(1000);
  Serial.flush();
  esp_sleep_enable_timer_wakeup(sleepTimeSec * 1000000);
  esp_deep_sleep_start();
}
What to Finish
I would like to add a miniature radiation shield for the external SHT40 to the box, which I would glue to the bottom of the box, where I added openings. The SHT40 would thus be protected by the solar panel, the 3D printed box, and additionally its own radiation shield.
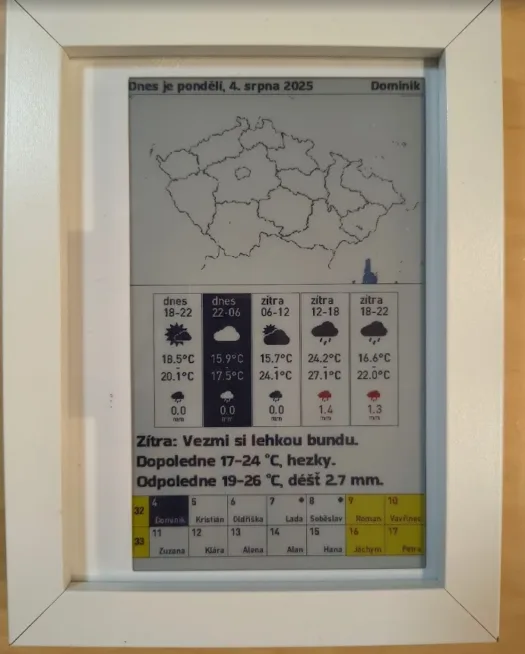
A Few Photos to Conclude

