You can find ISS and other satellite passes on Heavens-Above. But you have to open the site and check the cloud cover, too, if you want to know whether you’ll actually see anything.
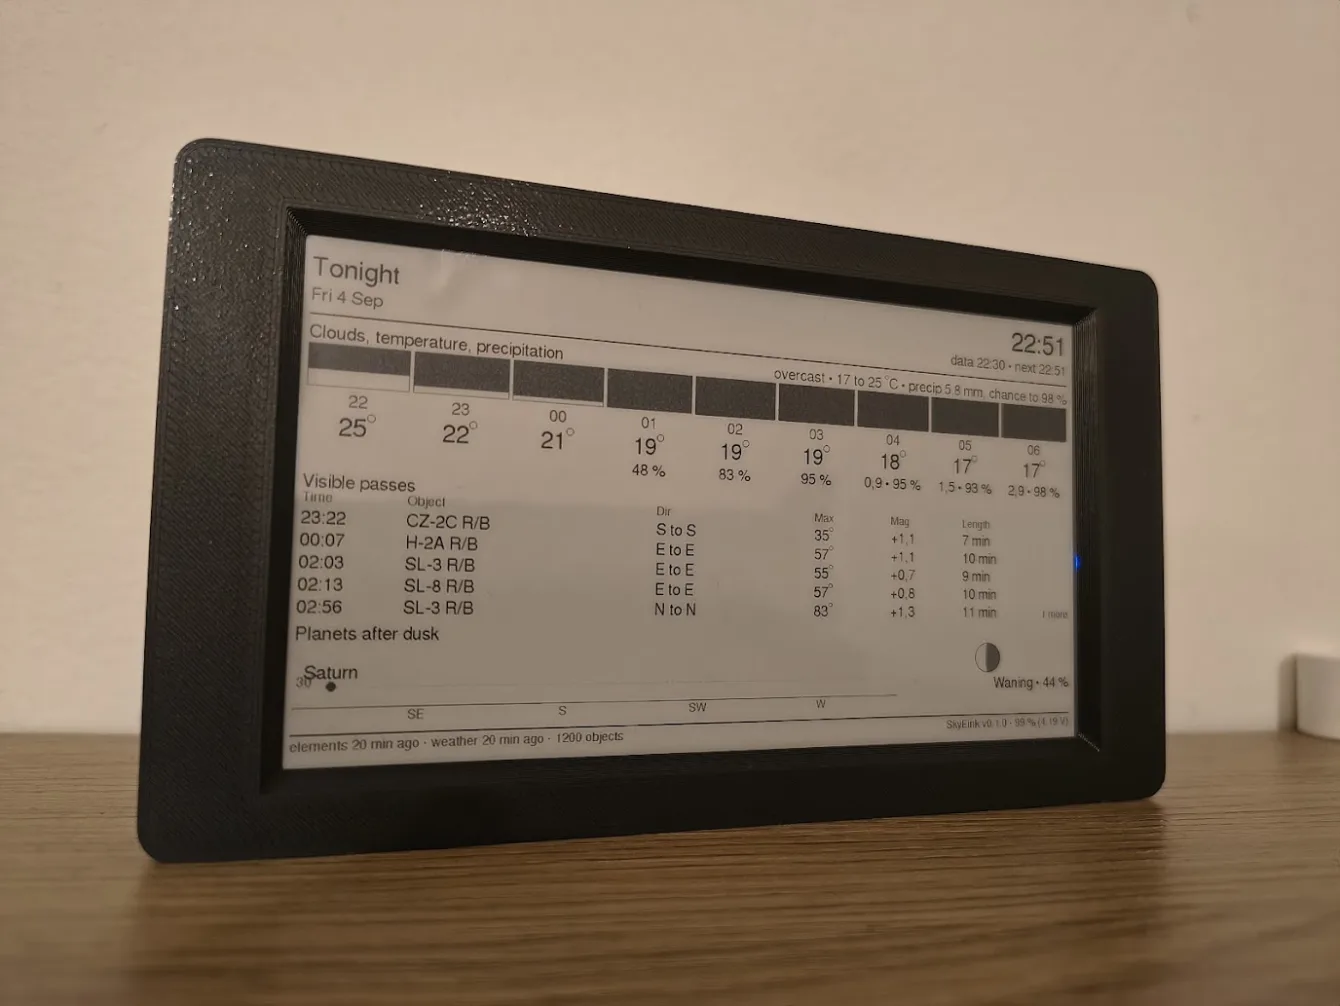
SkyEink is a smart display that calculates satellite passes and shows them on screen. For every pass visible to the naked eye tonight, it shows the time, direction, elevation above the horizon, and brightness. Next to that is an hourly cloud forecast, with planets and the Moon’s phase below.
It downloads data once a day and sleeps the rest of the time. Five minutes before a pass, it wakes up and shows the satellite’s path across the sky.
The Inkplate 5 Gen2 board was provided by Polish retailer Botland.cz. I wrote the firmware with Claude AI; the code is on GitHub under the MIT license.
What it can do
Satellite passes. Only passes you can actually see make it onto the list. The satellite must be illuminated by the Sun, it must already be past dusk where you are, and its estimated brightness must be above the configured threshold. Without those filters, you’d get hundreds of entries and only five you could see with the naked eye.
Hourly cloud cover. The brightest ISS pass is no use to you if it’s behind clouds. That’s why the cloud forecast is right at the top, with temperature and precipitation below it. The data comes from Open-Meteo.
Planets and the Moon. These are calculated on the ESP32, with no internet connection. If WiFi goes down, the ESP32 can still recalculate passes without the daily updates.
What you need
The main component is the Soldered Inkplate 5 Gen2. It has an ESP32-WROVER, a 1280×720 display with eight shades of gray, an RTC with backup battery, a microSD slot, and a LiPo charger. No soldering required.
I reused the Inkplate 5 Gen2 from an earlier project, a streetlight spectrum analyzer.
You’ll also need a LiPo battery with a 2.0 mm JST-PH connector (I recommend 1200 mAh or larger), a USB-C data cable, and 2.4 GHz WiFi. I recommend a FAT32 microSD card, too. Without one, data is stored in internal flash, but the card gives you peace of mind.
Why ePaper?
Battery-powered, it lasts for months, has great viewing angles, and, most importantly, doesn’t emit light. Nothing is shining in your eyes at night, and it works just as well on a wall as on a shelf or desk.
Flashing the firmware takes a minute
No Arduino IDE or libraries required. Just a browser.
- Download skyeink_vX.bin from the Releases section on GitHub.
- Connect the board to your computer with a USB-C cable. It must be a data cable – your computer won’t see the board with a charging-only cable.
- Open esp32flasher.chiptron.cz in Chrome, Firefox, or Edge. Safari doesn’t support Web Serial.
- Select the file, click Connect, and choose the board’s serial port.
- Start flashing and wait for it to finish.
Setup
After rebooting, the board starts a configuration access point. The display shows the network name, password, and a QR code. Connect with your phone, open http://192.168.4.1, and enter your WiFi details, language, and coordinates.
Enter the coordinates carefully. A satellite in low Earth orbit travels at 7.5 km/s, so an error of 50 km will give you a different time and direction. The quickest way to find your coordinates is to right-click your location in Google Maps.
The page has three tabs: basic settings, passes, and a brightness table. In the table, you can adjust the magnitude the firmware assigns to each type of object. Each entry has a short hint. The defaults should be enough, though 🙂
The interface is available in Czech and English. Change the language on the web page and it updates on the display, too.
The board has one user button. A short press starts a recalculation; holding it for five seconds starts the configuration access point.
What’s on the display
The screens switch automatically based on the Sun’s elevation.
Night
At the top is a cloud-cover band with nine hourly columns. The clouds fill in from the top down, because that’s where they come from, too. Each column has the hour, temperature, and precipitation in millimeters, with its probability.
In the middle is the pass table: time, object, direction, maximum elevation, magnitude, and pass duration. The brightest pass has a gray background. Faint passes are shown in gray text – no point heading outside for those without binoculars.
At the bottom is a horizon band with the planets, and the Moon next to it showing its actual phase.
Pass detail
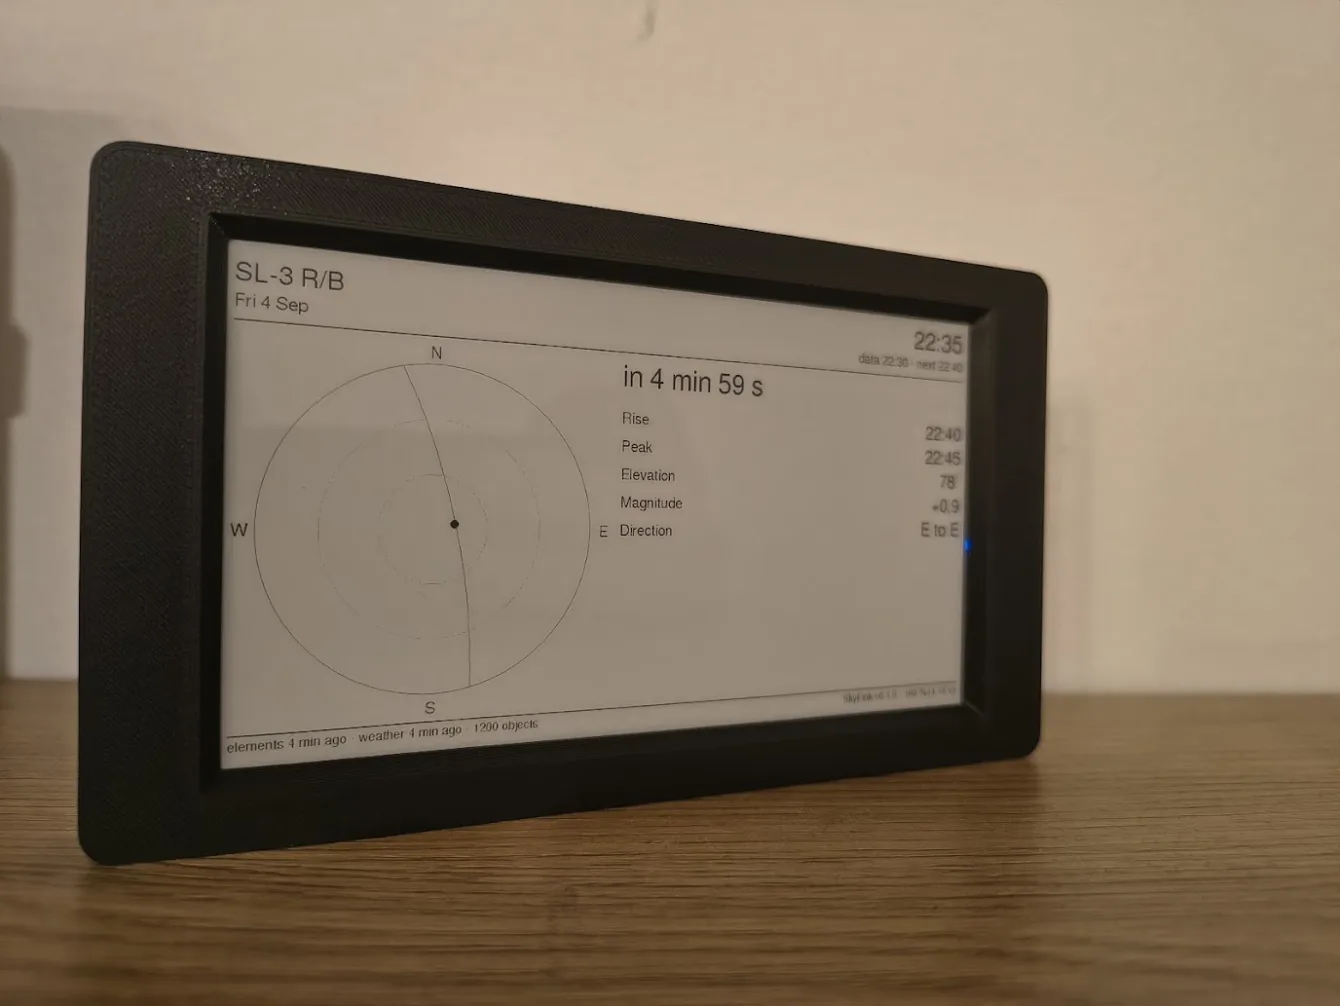
Five minutes before a pass, the board wakes up and shows a polar sky chart with the satellite’s path, magnitude, elevation, and direction. When the satellite rises above the horizon, the display redraws to show “in progress.” One minute after it sets, the display goes back to the overview.
The clock in the header doesn’t run. ePaper only refreshes when something changes, so it shows the time of the last refresh. Check your phone for the exact time.
Day and status
During the day, you’ll see the next evening pass, cloud cover, and dusk times. The status screen appears automatically if something goes wrong. It shows the age of the data, battery voltage, time zone, and free space on the card.
Every screen has a bar at the bottom showing the age of the data and the time of the next update.
How it figures out what’s actually visible
The catalog contains hundreds of objects, and calculating one position with the SGP4 library takes about three milliseconds on the ESP32. Calculating every object would take forever, so the process is split into stages.
First comes a geometric pre-filter. Based on the orbital plane and its precession, it calculates whether an object will pass above your location at all during the night. For example, the Hubble Space Telescope has an orbital inclination of 28.5° and never gets above 20° from the 50th parallel, so it gets filtered out straight away.
The objects that pass the filter go through nextpass() from the Sgp4 library. It finds the rise, peak, and set times.
Then the firmware trims the pass to the part when the satellite is illuminated and the Sun is at least 6° below your horizon. It calculates the magnitude at the highest point of that illuminated section. Otherwise, a satellite that reaches its peak in Earth’s shadow would get a brightness value you’ll never see.
I compared the results with Heavens-Above. Evening ISS pass: SkyEink 19:39, maximum elevation 65°, magnitude -3.6. Heavens-Above 19:41, 65°, -3.5. Second pass: 56° and -3.3 versus 54° and -3.2. Not bad at all for an ESP32 🙂
It stores the orbital elements and calculated passes on the SD card. When it wakes up for the weather or a pass, it doesn’t recalculate anything and is back to sleep in 16 seconds.
What I handled in the code
Celestrak allows one download per data update. That’s been the rule since March this year. A second request returns a 403, and if you keep trying, your IP gets blocked. So the firmware downloads data at most once a day and keeps the old data if it gets a 403.
Five-digit catalog numbers ran out in July. New objects have six-digit numbers, which Celestrak doesn’t provide TLEs for. I switched to CSV and now assemble the two-line elements on the board. If you’re building a project around TLEs today, most new satellites will be missing from it in a few months.
There are more than 9,000 Starlink objects. That’s two megabytes and over an hour of calculations. So the download filter selects only orbits below roughly 500 km – newly launched groups that are still climbing and are bright. Operational Starlinks at 550 km have a magnitude of +5 to +7, so you won’t see them with the naked eye anyway.
Open-Meteo is free, but licensed under CC BY 4.0. Non-commercial use is fine, but you must credit the source in anything you publish.
Some providers block NTP (UDP port 123). The firmware can get the time from the Date header in an HTTPS response instead. If that doesn’t work either, it uses the time from the browser you used to configure the device.
What worked and what didn’t
What worked:
- Power consumption. The firmware uses about 4 mAh per day, so a 2000 mAh battery lasts for months.
- No need to touch anything. The screens switch automatically, and the board wakes up for a pass on its own.
- Planets, the Moon, and dusk calculations work without internet.
- The age of the data is always visible.
What annoys me:
- The power indicator LED on the board. It’s permanently connected through a 1 kΩ resistor, draws about 0.4 mA, and uses 10 mAh per day – more than twice as much as the entire firmware. If you want even longer battery life, you’ll have to desolder R35.
So, is it worth building?
My take: it’s an interesting project. I haven’t found many satellite displays this comprehensive online. The data is free to download, the ESP32 can decode it, and the firmware handles sleeping and waking at the right time intelligently.
I compared the calculations with Heavens-Above, and they matched remarkably well 🙂
GitHub: github.com/petus/SkyEink
Flasher: esp32flasher.chiptron.cz
Data: celestrak.org, open-meteo.com